Tuesday, November 8, 2011

Chocolate Demise

There's a reason it's called "Demise." First, there's the demise of your grocery budget. The cost of the materials for this cake could cover my lunches for about a week.
Second, there's the demise of your calorie budget. Again, lunches for a week. In about two slices.
Third, there's the demise of your willpower. Trust me: this cake is worth every guilty twinge. It's the kind of dessert that grabs you from bite #1, drowns you in its intensity, and leaves you with a quickened heart rate and saucer-like eyes, thinking, "Ah, what just happened here?"
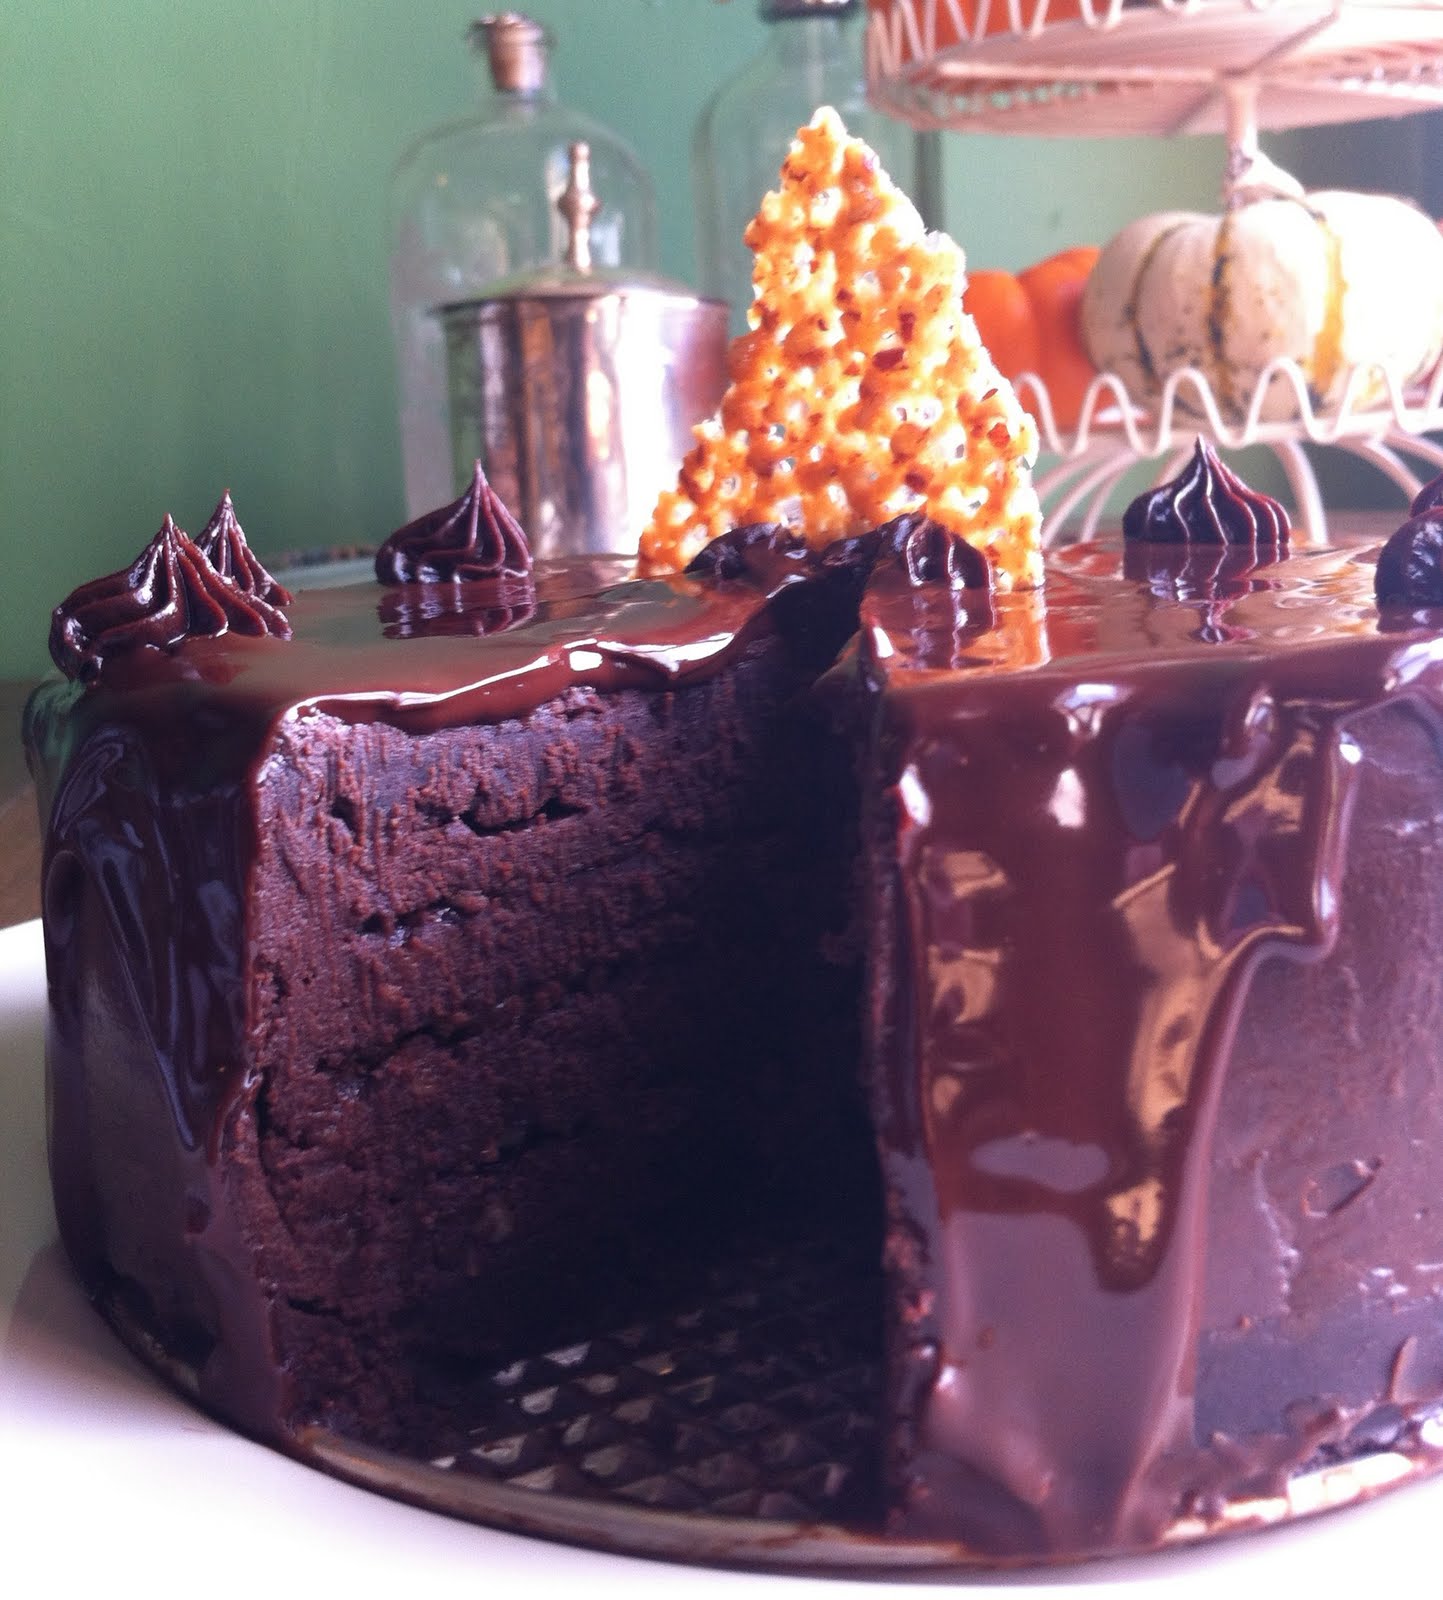
Mostly because it's not really what I could call "cake," at least not with a clear conscience. The recipe requires a mere 2/3 cup of cake flour - and that's not even for the cake layers! The rest is chocolate, more chocolate, yet more chocolate, butter, and cream. Plus crunchy layers of caramelized pecans to mix up the texture and flavor. Really, you're looking at a very large, homemade truffle. Amazingly good, but not so much "cake."


Rating: 5 out of 5

Highs:
It's like eating a huge version of the best chocolate truffle you've ever had.
The crispy, buttery tuiles perfectly punctuate the intense layers of smooth ganache.
It's sheer joy to write "36 oz semisweet chocolate!" on your grocery shopping list (when was the last time you got to do that, huh?).

Lows:
Baking an "evenly caramel-colored" tuile is harder than it sounds (as evidenced by my several evenly asphalt-colored tuiles).
Unsticking the aforementioned tuiles from the "nonstick" baking sheets may result in a moment or two of cussing.
This is a multi-day project cake. Do not attempt it in the few spare hours before and after work. It requires focus, people.


Pecan Tuiles
1 c. pecan pieces
2/3 c. tightly packed light brown sugar
1/4 pound unsalted butter
1/2 c. light corn syrup
2/3 c. cake flour

Preheat the oven to 325. In the bowl of a food processor fitted with a metal blade, chop 1 c. pecan pieces into pieces 1/8 inch in size. Set aside until needed.
Heat the brown sugar, butter, and corn syrup in a 2 1/2 quart saucepan over medium heat. Bring to a boil, then remove from heat. Add the chopped pecans and the cake flour and use a rubber spatula to thoroughly combine.
Portion 4 T of pecan butter in the center of each of 2 nonstick baking sheets. The batter will spread to 8 inches during baking, so it is necessary to portion only 1 large tuile per baking sheet. Place the baking sheets on the top and bottom shelves of your oven and bake for 16 minutes (rotate the sheets halfway through the baking time), until evenly caramel-colored. Allow the baked tuiles to cool on the baking sheets for 7 to 10 minutes before handling, then transfer to a cooling rack to completely cool.
Portion and bake two more tuiles.

Truffle Cake
1/2 pound plus 2 T. unsalted butter (2 T. melted)
16 oz. semisweet chocolate, broken into 1/2-inch pieces
4 eggs
2 egg yolks

Lower the oven temp to 300. Lightly coat the insides of two 9x2-inch round cake pans with melted butter. Line each pan with parchment paper, then lightly coat the parchment with more melted butter. Set aside.
Heat 1 inch of water in the bottom half of a double boiler over medium heat. Place the semisweet chocolate and 1/2 pound of butter in the top half of the double boiler. Tightly cover the top with film wrap. Allow to heat for 15 minutes. Remove from the heat, and stir until smooth. Transfer the chocolate to a stainless steel bowl, using a rubber spatula to remove all the chocolate. Keep at room temp till needed.
Heat 1 inch of water in the bottom half of a double boiler over medium heat. Place the eggs and egg yolks in the top half of the double boiler. Whisk the eggs until they reach a temperate of 110, about 4-5 minutes. Transfer the heated eggs to the bowl of an electric mixer fitted with a balloon whip. Whisk on high until the eggs become light and pale in color, about 6 to 7 minutes. Remove the bowl from the mixer. Fold 1/3 of the eggs into the melted chocolate. Add the remaining eggs and fold together gently but thoroughly. Divide between the prepared pans, spreading evenly, and bake in the preheated oven for 20 to 25 minutes, until the internal temperature of the layers reaches 170.
Remove the truffle layers from the oven and allow to cool to room temperature for 20 minutes. Invert one of the truffle layers onto a cardboard cake circle. Invert the layer onto the bottom of a closed springform pan. Refrigerate the truffle layers until needed.

Ganache Topping
3 c. heavy cream
6 T. unsalted butter
4 T. granulated sugar
20 oz. semisweet chocolate, broken into 1/2-oz. pieces
6 oz. unsweetened chocolate, broken into 1/2-oz. pieces

Heat the heavy cream, 6 T. unsalted butter, and sugar in a 2 1/2 quart saucepan over medium-high heat. When hot, stir to dissolve the sugar. Bring the mixture to a boil. Place 20 oz. semisweet chocolate and the unsweetened chocolate in a large stainless steel bowl. Pour the boiling cream over the chocolate and allow to stand for 5 minutes. Stir until smooth. Reserve and refrigerate 3/4 c. ganache; hold the rest at room temperature.

Assembling the Cake
Remove the truffle layers from the fridge. Pour 3/4 c. ganache over the truffle layer in the springform pan, spreading it evenly to the edges. Place one of the large tuiles on top of the ganache, gently pressing it into position. Pour 3/4 c. ganache over the tuile, spreading the ganache evenly to the edges. Top this layer of ganache with another tuile, gently pressing it into place. Repeat until all four tuiles are used. You should end with a layer of ganache. Slide the remaining truffle layer onto the ganache, gently pressing down on the truffle to set it into position. Cover the springform pan with film wrap and freeze for 1 hour.
Remove the cake from the freezer. Cut around the inside edges to release it from the pan, then use a cake spatula to create an even coating of ganache on the top and sides. Refrigerate for 30 minutes.
Transfer the reserved refrigerated ganache to a pastry bag fitted with a medium-sized star tip. Pipe stars onto the top of the cake as desired and decorate with any broken bits of tuile.

Serving the Cake
Cut with a serrated slicer, heating the blade fo the slicer under hot running water before making each slice. Allow the slices to come to room temperature for 45 to 60 minutes before serving.

Sunday, October 23, 2011

Willy Wonka Pumpkin Pie

Why Willy Wonka pumpkin pie? Well, because while Mile High Pumpkin Pie is probably a snappier-sounding choice, it's also something that a marketer would come up with. (And my tolerance for marketing copy is quite low at the moment.)
Plus, when I was whipping up the meringue for this pie, all I could picture is the scene from Willy Wonka (the original one) in which Mike TV's mom scoops white cream out of a ginormous red mushroom.


This pie came about thanks to the following:
1. Horrifying, canyon-like cracks in a pumpkin pie that really needed to look as good as it tasted (it was for a party).
2. A browse through the November issue of Martha Stewart Living.

As soon as I'd finished baking the pumpkin pie, I realized it was doomed to be the dessert equivalent of a kid that gets picked last for dodge ball. I had to find a way to cover up the cracks that stretched from end to end. (I had made the pie from a special recipe, so there was no way that I was going to be ok with it getting shelved until party goers were only coming back for seconds.) Maybe craft a grapevine out of pie dough and drape it sinuously over the cracks? No, too obvious. Plus, my pie dough sculpting skills leave a lot to be desired.

Unlike with cakes, there isn't much you can do when a pumpkin pie cracks, particularly if the cracks seem to have a goal of spanning the full diameter of the once-smooth top. Then I remembered: Didn't the November issue of Living feature some crazy meringue pumpkin pie? Something that looked like it would grace the table at Willy Wonka's Thanksgiving celebration? (Ok, so he was British in the original movie and likely didn't celebrate Thanksgiving, but let's just assume for the sake of this story that he's more of an international figure.)

Long story longer: The meringue topping turned my ugly duckling pie into something that ended up being at least a conversation piece at the party. The kids were freaking out, and the adults were like, "Geez, how many egg whites were harmed in the making of that pie?"

One more thing: While the visual focus obviously is the meringue, this is one incredibly good pumpkin pie, cracked top aside. It doesn't usually crack, too - this was the first time - so I highly recommend this pie for your upcoming Thanksgiving celebrations, with or without the meringue topping.

Pie Dough(Note: Makes enough for 2 pumpkin pies)

2 c. flour
1/2 t. salt
12 T. (1 1/2 sticks) butter, chilled
3 T. margarine or chilled vegetable shortening
1/4 c. ice water

In a large bowl, sift the flour and salt. Cut the chilled butter and margarine/shortening into 1 T. bits and add to the flour. With a pastry cutter, work flour and shortening together until mixture resembles coarse meal. Add the ice water little by little, pressing the pastry together into a ball. Flatten into a 4-inch disk and wrap in plastic wrap.
Chill for at least 1 hour (Seriously. Do it. The secret to light, flaky pastry is to keep the mixture cool, add as little water as possible, and mix only as much as necessary.)
Remove from refrigerator; let stand at room temperature to soften slightly, about 10 minutes, or until dough is pliable. Roll out dough on lightly floured work surface to a 12-inch disk about 1/8-inch thick. Fold dough in quarters, then place dough point in center of pie pan. Unfold dough.
Press dough into pan, trim edge, and flute or otherwise decorate edges. Refrigerate pie shell for 40 minutes and then freeze for 20 minutes (sometimes I skip the freezing step and it still turns out fine).

Pumpkin Pie (makes enough for one pie)
2 c. (16 oz.) plain canned pumpkin puree
1 c. packed dark brown sugar
2 t. ground ginger
2 t. ground cinnamon
1 t. fresh grated nutmeg
1/4 t. ground cloves
1/2 t. salt
2/3 c. heavy cream
2/3 c. milk
4 large eggs

Adjust oven rack to lower and middle positions and heat oven to 375. Press doubled 12-inch square of aluminum foil inside dough shell; evenly distribute 1 c. ceramic or metal pie weights over foil. Partially bake pie shell on a middle rack until dough dries out, about 17 minutes.
Carefully remove foil and weights.
Meanwhile, process pumpkin, brown sugar, spices, and salt in a food processor fitted with steel blade for 1 minute. Transfer pumpkin mixture to a 3-quart heavy-bottomed saucepan; bring it to a sputtering simmer over medium-high heat. Cook pumpkin, stirring constantly, until thick and shiny, about 5 minutes.
As soon as pie shell comes out of oven, increase oven temperature to 400 degrees. Whisk heavy cream and milk into pumpkin and bring to a bare simmer. Process eggs in food processor until whites and yolks are mixed, about 5 seconds. With motor running, slowly pour about half of hot pumpkin mixture through feed tube. Stop machine and scrape in remaining pumpkin. Process 30 seconds longer.
Immediately pour warm filling into hot pie shell. (Ladle any excess filling into pie after it has baked for 5 minutes or so--by this time filling will have settled.) Bake pie on lower rack until filling is puffed, dry-looking, and lightly cracked (but not sooo cracked, ugh!) edges, and center wiggles like Jello when pie is gently shaken, about 25 minutes. Cool on wire rack for at least 1 hour.

Meringue Topping
2 c. granulated sugar
8 large egg whites, room temperature

Just before serving the pie, make the meringue. Combine sugar and egg whites in the heatproof bowl of a mixer set over a pan of simmering water (alternatively: use a double boiler and then transfer the egg/sugar mixture to the mixer bowl later). Whisk until sugar dissolves, about 3 minutes.
Transfer bowl to mixer, and whisk on medium speed for 3 minutes. Raise speed to high, and whisk until stiff glossy peaks form, about 6 minutes more.
Dollop meringue onto pie and spread using a swirling motion, creating peaks and valleys in the meringue.
Hold a small handheld kitchen torch at a 90-degree angle 3 to 4 inches from the surface of meringue.
Move flame back and forth until meringue starts to brown.
If you don't have a kitchen torch, just heat your oven's broiler and bake pie on top rack until meringue starts to brown - 2 to 4 minutes (watch it carefully).

Saturday, October 1, 2011

Boston Cream Pie: Ode to a Fair City


Yes, it's been forever since the last post. (Deepest apologies to my 3 followers.) And this post is a bit of a rebellious one, as I've dared to deviate from the recipes of Death by Chocolate in order to pay homage to my recent trip to Boston. That fair city is now officially on my list of Top 5 Cities of All Time. If Boston were a man, I'd be head over heels (a girl's dream: sophisticated, well-educated, gorgeous).
But back to baking. While in Boston, I spent 45 minutes dragging my poor friend around the North End in a focused hunt for a slice of Boston Cream Pie. (Learning in the process that Boston Cream Pie is actually cake, not pie. I believe it was called pie because when it was first concocted in the 19th century, it was baked in a pie pan.)
I finally settled for a slice from Bova's Bakery (which, it should be noted, is famous for Italian bread. Not Boston Cream Pie.). Their version looked like something you'd find in Barbie's kitchen. And its taste reflected its appearance: plastic. As I've never had Boston Cream Pie, I wasn't sure whether Bova's version was just bad, or whether it was truly what Boston Cream Pie is meant to taste like. Bova's was a white, flavorless sponge cake sandwiching a cream filling - of cheap donut ilk - and topped with a glassy layer of what appeared to be chocolate glaze. In a word: gross.
Not ready to give up on Boston Cream Pie just yet, I decided to make my own using a recipe from my beloved The Best Recipe cookbook, which has only failed me once (don't try the brownies). So I spent the better part of this afternoon whipping up my first-ever Boston Cream Pie.
I'm happy to report that the homemade version is much better than the plastic pretender at Bova's.
I must admit, though: I could never give Boston Cream Pie 5 stars. When it comes to desserts, I'm a bit high-maintenance. I need flavor - deep valleys of flavor (intense chocolate that's worth its weight in Tums). And texture - steep pinnacles of texture (fluffy meringue counterbalancing a crispy crust).
Boston Cream Pie is a nice cake. The sponge cake is good, but it's sponge cake, you know? The cream filling is creamy, but it doesn't really have a lot of flavor (I'm tempted to advise that you double the rum). And the chocolate glaze, when done well, is good. But overall, the cake is just a nice cake, with all the flavors and textures blending together into a mellow dessert. I probably wouldn't make it again unless someone asked me to.
However, for those of you who also have been dying to try a true Boston Cream Pie, with this recipe you can skip visit to Bova's on your trip to Bean Town, and enjoy a decent version from the comfort of your own kitchen.

Start with Foolproof Sponge Cake:


  • 1/2 c. plain cake flour

  • 1/4 c. all-purpose flour

  • 1 t. baking powder

  • 1/4 t. salt

  • 3 T. milk

  • 2 T. unsalted butter

  • 1/2 t. vanilla

  • 5 large eggs, room temperature

  • 3/4 c. sugar

    Adjust oven rack to lower-middle position and heat oven to 350 degrees. Grease two 8- or 9-inch round cake pans and cover the bottoms with parchment paper. Whisk flours, baking powder, and salt in a medium bowl. Heat milk and butter in a small saucepan over low heat until butter melts. Remove from heat and add vanilla; cover and keep warm.
    Separate three of the eggs, placing whites in bowl of standing mixer fitted with whisk attachment (or large mixing bowl if using a hand mixer) and reserving three yolks plus remaining two whole eggs in another mixing bowl. Beat the three whites on low speed until whites are foamy. Increase mixer speed to medium and gradually add 6 T of the sugar; continue to beat whites to soft, moist peaks. (Do not overbeat.) If using standing mixer, transfer egg whites to a large bowl and add yolk/whole-egg mixture to mixing bowl.
    Beat yolk/whole-egg mixture with remaining 6 T sugar. Beat on medium-high speed until eggs are very thick and a pale yellow color, about 5 minutes. Add beaten eggs to whites.
    Sprinkle flour mixture over beaten eggs and whites; fold very gently 12 times with a large rubber spatula. Make a well in one side of batter and pour milk mixture into bowl. Continue folding until batter shows no trace of flour and whites and whole eggs are evenly mixed, about 8 additional strokes.
    Immediately pour batter into prepared baking pans; bake until cake tops are light brown and feel firm and spring back when touched (about 16 minutes for 9-inch pans; 20 minutes for 8-inch pans).
    Immediately run a knife around pan perimeter to loosen cake. Invert cakes onto cooling racks and cool to room temperature.

Pastry Cream

  • 2 c. milk
  • 6 large egg yolks
  • 1/2 c. sugar
  • 1/4 t. salt
  • 1/4 c. cornstarch, sifted
  • 1 t. vanilla
  • 1 T. rum
  • 2 T. unsalted butter (optional according to The Best Recipe, though I definitely don't consider it as such)

    Heat milk in a small saucepan until hot but not simmering. Whisk yolks, sugar, and salt in a large saucepan until mixture is thick and lemon-colored, about 3-4 minutes. Add cornstarch; whisk to combine. Slowly whisk in hot milk. Cook milk mixture over medium-low heat, whisking constantly and scraping pan bottom and sides as you stir, until mixture thickens to a thick pudding consistency and loses all traces of raw starch flavor (blech) - about 10 minutes.
    Off heat, stir in vanilla, rum, and butter (if using) and transfer to another container to cool to room temp, placing a piece of plastic wrap directly on surface of mix to prevent skin from forming. Refrigerate pastry cream until firm. (Can be refrigerated overnight.)
    To ensure that pastry cream does not thin out, do not whisk once it has set.


Rich Chocolate Glaze


  • 1 c. heavy cream
  • 1/4 c. light corn syrup
  • 8 oz. semisweet chocolate, chopped into small pieces
  • 1/2 t. vanilla

    Bring cream and corn syrup to a full simmer over medium heat in a medium saucepan. Off heat, add chocolate; cover and let stand for 8 minutes. (If chocolate has not completely melted, return saucepan to low heat; stir constantly until melted.) Add vanilla; stir very gently until mixture is smooth. Cool until tepid so that a spoonful drizzled back into pan mounds slightly. (Glaze can be refrigerated to spped up cooling process, stirring every few minutes to ensure even cooling.)
    While glaze is cooling, place one cake layer on a cardboard round on cooling rack set over waxed paper. Carefully spoon pastry cream over cake and spread evenly up to cake edge. Place the second layer on top, making sure layers line up properly.
    Pour glaze over middle of top layer and let flow down cake sides. Use a metal spatula, if necessary, to completely coat cake. Use a small needle to puncture air bubbles. Let sit until glaze fully sets, about 1 hour. Cut and serve.


Tuesday, May 17, 2011

White Chocolate Cheesecake


If you're a cheesecake aficionado, this is one to try, especially if you like white chocolate (the redheaded stepchild of the chocolate family, if we’re to be honest). Personally, I haven't seen white chocolate cheesecake on many restaurant dessert menus, other than The Cheesecake Factory's , which is kind of a given. Thus, I deem this recipe worthy of the time and ingredient investment, as your chances of finding a good white chocolate cheesecake while dining out are probably fewer than for other cheesecake flavors.

Rating: 4

Highs

1. This is white chocolate taken to the next level. In my opinion, white chocolate is unmatched in its distinctive tangy flavor mellowed by the creamy smoothness of all that cocoa butter and cream. (Yes, there’s the old, tired argument that white chocolate isn’t really chocolate. True. How else would you categorize it, though? I find myself wondering how long the people who categorize foods pondered that one.) Combine white chocolate with cream cheese and heavy cream and you’ve got creamy perfection (and, yes, a lot of saturated fat to boot).

2. If you really like cheesecake, but sometimes the plain New York variety just doesn't do it for you, then this is your cheesecake. It doesn’t have give-your-taste-buds-a-lashing flavor, but it does pack enough that it can hold its own on the cheesecake flavor wheel (should one exist).

3. Grammar rules say that if you write a numerical list, you should have a least three items. I don’t actually have three Highs for this section, but I'm kind of a rules girl, so now at least we have a tidy list of 3 items.

Lows


1.Twelve hours. Twelve. That’s how long you’re supposed to leave the cake in the fridge to chill. That’s not counting the amount of time to takes to prepare and bake the cake.

You know the process is going to be a bit of a slog when the chef’s note for this recipe says, “…it is advisable to organize the production of the White Chocolate Cheesecake over 2 or 3 days." The reference to making a cheesecake as a “production,” should be the first clue!

2. It’s a bit much. A chocolate crust and chocolate ganache topping? It just seemed like overkill to me, which is why I ended up skipping the ganache topping (yet again breaking my rule of following the recipe to the letter). I just drizzled some chocolate sauce over the top and called it good.

3. The high-maintenance baking process produces disappointing results. The very center of the cake wasn’t quite baked through, which was frustrating given how much nudging of the temperature dial and arranging of the water level was going on during the prep and baking process.


Special equipment:


  • 9 x 3-inch springform pan

  • Food processor

  • Instant-read test thermometer


Ingredients:

Chocolate Cookie Crust


(Theoretically, you could substitute the fudge cookies with store-bought chocolate wafer cookies to save time. I recommend doing this, although I didn't take my own good advice.)

White Chocolate Cheesecake


  • 18 oz. white chocolate, broken into ½-oz. pieces

  • ½ c. heavy cream

  • 1 ¾ pounds cream cheese, softened

  • 1 c. sugar

  • 1 t. salt

  • 6 eggs

  • 1 t. vanilla


Chocolate Ganache


  • 1/3 c. heavy cream

  • 1 T. unsalted butter

  • 1 T. sugar

  • 3 oz. semisweet chocolate, broken into 1/2-oz. pieces


White Chocolate Curls


  • 1 large white chocolate bar


Instructions:

Preheat the oven to 325 degrees Farenheit.

Coat the inside of a 9x13-inch springform pan with 1 T. butter. In a food processor fitted with a metal blade, chop the cookies in 2 batches. Pulse each batch until all the cookies are in crumbs (this should yield 2 ½ c. crumbs), 10 to 15 seconds. Transfer the crumbs to a stainless steel bowl. Combine the cookie crumbs with 2 T. melted butter. Mix by hand until the crumbs bind together. Press the crumbs around the buttered sides of the pan, then onto the buttered bottom of the pan. Place pan in the freezer for 15 minutes.

Heat 1 inch of water in the bottom half of a double boiler over medium-high heat. Place the white chocolate and ½ c. heavy cream in the top half of the double boiler. Tightly cover the top with film wrap. Allow to heat for 10-12 minutes. Remove from heat and stir until smooth. Set aside until needed.

Place the softened cream cheese, 1 c. sugar, and salt in the bowl of an electric mixer fitted with a paddle. Beat on low for 1 minute, on medium for 1 minute, and on high for 1 minute. Scrape down the sides of the bowl, then beat on high for 1 more minute. Scrap down the bowl again. Add the eggs, 2 at a time, beating on medium for 15 seconds after adding, and scrape down the bowl after each addition. Add the vanilla and melted chocolate mixture, then beat on medium for 15 seconds. Remove the bowl from the mixer and use a rubber spatula to finish mixing the batter until it’s smooth and thoroughly combined. Pour the cheesecake mix into the prepared springform pan, spreading evenly.

Place a baking sheet with sides partially filled with 4 c. hot water on the bottom rack of the oven (the bottom rack should be at least 3 inches below the center rack). Place the springform pan on the center rack of the oven and bake for 15 minutes. Lower the temperature to 250 degrees F and bake for 15 minutes. Lower the temp to 225 F and bake for 15 minutes. Then lower the temp to 200 degrees F and bake the cheesecake until the internal temp of the cheesecake filling reaches 170 degrees F, about 2 hours and 45 minutes. Turn off the oven and allow the cheesecake to remain in the oven undisturbed for an additional 2 hours. Remove from the oven and cool at room temp for 1 hour. Refrigerate the cheesecake for 12 hours (do not remove cake from pan).

After the cheesecake has been refrigerated for 12 hours, prepare the chocolate ganache. Heat 1/3 c. heavy cream, 1 T. butter, and 1 T. sugar in a 1 ½-quart saucepan over medium-high heat. Bring to a boil.

Place the semisweet chocolate in a stainless steel bowl. Pour the boiling cream over the chocolate and allow to stand for 3 to 4 minutes. Stir until smooth. Pour over the top of the chilled cheesecake. Use a rubber spatula to spread the ganache evenly over the top of the cake, being careful not to spread it over the edge and down the sides of the cheesecake. Refrigerate for 30 minutes to set.

The cheesecake can now be released from the springform pan. To do this, wrap a damp, hot cotton towel around the sides of the pan (the towel should be large enough to wrap completely around and cover the sides of the pan – do test this before you select a towel!). Hold it around the pan for about 1 minute.

Carefully release and remove the springform pan. Use a serrated knife to trim the crust so that it is level with the ganache (trim the crust away from the cake so that it does not fall into the ganache).

Decorate the top of the cake with white chocolate curls. To do so, slightly soften a bar of white chocolate and slowly run a vegetable peeler over it to produce chocolate curls.

Heat the blade of the slicer under hot running water before slicing into the cheesecake. Cut the cheesecake with the serrated slicer, reheating the slicer after each slice. Place a piece of cheesecake in the center of each plate and serve.


Saturday, February 5, 2011

Chocolate Strawberry Mousse Cake

I hesitate to even call this a cake because I think it deserves its own dessert category. Perhaps even its own food category. It's a lifelong love-at-first-bite dessert. It's the kind of cake that pops into your head when you're asked what you'd have for dessert for your last meal on earth. It's simply incredible. Note also that it's the cake chosen for the cover photo of this cookbook. (Which says a lot about the presentation power of this cake. It also casts some doubt on the much-touted Death by Chocolate Cake for which this cookbook is named.)

Rating: 5

Highs
I have several solid reasons for this rating:

1. The lengthy ingredients list and recipe belies the simplicity of this cake. While seemingly intimidating, this masterpiece is actually foolproof. While I managed to foul up not only the cake (underbaked it), the mousse filling (used the wrong type of cream), and the construction (not enough strawberries), it still turned out delicious and beautiful.

2. Even the rather stoic Germans who were in my life when I baked this, and who don't usually like sweet cakes, raved about it and speak of it to this day ("Are you going to make that strawberry one again?"). It is a sure crowd pleaser, even among those who may not normally be cake fans.

3. It hits that sweet spot between decadent and light, with flavors rich and varied. It's one thing to have dessert; it's another to take a stroll through Willy Wonka's chocolate factory. Each bite of this cake is like that stroll, thanks to the many textures and flavors involved (dense chocolate-y cake with slightly crackly edges; sweet, creamy, fluffy mousse that takes the edge off the rich chocolate; bursts of fresh strawberry offering a bit of tang and refreshment).


Lows

If you've been following this blog, you're probably seeing a pattern emerge. Recipes in Death by Chocolate are either expensive or time-consuming, and often both. For chocolate lovers and bakers, cutting too deeply into the grocery budget to fund a baking session dedicated to a new chocolate creation is but a small sacrifice. However, for the rest of humanity, many of these recipes are probably best suited for times when you want to pull out all the stops for a labor of love. Like for Valentine's Day! If you take the time to bake this, though, you won't regret it.


Chocolate Strawberry Mousse Cake

Equipment

  • Food processor fitted with metal blade

  • Three 9x1/2-inch cake pans

  • 9x3-inch springform pan

  • Two 9-inch cake circles

  • Parchment paper

Ingredients


Chocolate cake
  • 1/2 lb. butter (2 T. melted)

  • 8 oz. semisweet chocolate, broken into 1/2-oz. pieces

  • 8 egg yolks

  • 3/4 c. sugar

  • 4 egg whites

Chocolate strawberry mousse


  • 2 pints strawberries, stems removed

  • 16 oz. semisweet chocolate, broken into 1/2-oz. pieces

  • 6 egg whites

  • 2 T. sugar

  • 1 c. heavy cream

Semisweet chocolate ganache


  • 1 c. heavy cream

  • 2 T. butter

  • 2 T. sugar

  • 12 oz. semisweet chocolate, broken into 1/2-oz. pieces


Instructions

Lightly coat the insides of three 9x1/2-inch cake pans with melted butter. Line each pan with parchment paper, then lightly coat the parchment with more melted butter. Set aside.

Preheat the oven to 350 F. Heat 1 inch water in the bottom half of a double boiler over medium heat. Place remaining butter and 8 oz. semisweet chocolate in the top half. Tightly cover the top with film wrap. Allow to heat for 10-12 more minutes. Remove from heat, stir until smooth, and hold at room temperature.

Place the egg yolks and 3/4 c. sugar in the bowl of an electric mixer fitted with a paddle. Beat on high until slightly thickened and lemon-colored, about 4 minutes. Scrape down the sides of the bowl and beat on high for another 2 minutes.

While egg yolks are beating, whisk 4 egg whites in a large stainless steel bowl until stiff but not dry, about 3-4 minutes.

Using a rubber spatula, fold the melted chocolate mix into the beaten egg yolk mixture. Add a quarter of the beaten egg whites and stir to incorporate, then gently fold in the remaining egg whites.

Divide the batter evenly between the prepared pans, spreading to even, and bake in the preheated oven until a toothpick inserted in the center comes out clean, about 25-30 minutes. Remove cakes from the oven and allow to cool in the pans for 15 minutes. (During baking, the surface of the cakes will form a crust; this crust will normally collapse when the cakes are removed from the oven.)

Invert one of the cakes onto the bottom of a springform pan. Invert the other two cakes onto cake circles. Remove the parchment paper and refrigerate cakes for 30 minutes.

To prepare the chocolate strawberry mousse, reserve 12 of the best-looking strawberries to decorate the top of the cake. In a food processor, puree 4 oz. of strawberries (12 medium-sized berries should yield 1/2 c. of puree). Set aside until needed. Refrigerate the remaining berries until needed (that includes 12 for decor).

Heat 1 inch of water in the bottom half of a double boiler over medium heat. Place 16 oz. semisweet chocolate, the white chocolate, and the strawberry puree in the top half of the double boiler. Tightly cover with film wrap. Allow to heat for 12 to 14 minutes. Remove from the heat and stir until smooth. Transfer to a stainless steel bowl, using a rubber spatula to remove all of the melted chocolate mix. Keep at room temp until needed.

In the bowl of an electric mixer fitted with a balloon whip, whisk the 6 egg whites on high until soft peaks form, about 2 minutes. Continue to whisk on high while gradually adding 2 T. sugar. Whisk unil stiff but not dry, about 30 seconds. Set aside at room temperature until needed.

With a handheld mixer, whip the cream in a well-chilled stainless steel bowl until stiff. Fold a quarter of the egg whites into the melted chocolate mixture, then fold in the whipped cream. Now fold in the remaining egg whites. Set aside at room temperature.

Assemble the springform pan. Spread 1/2 c. of chocolate strawberry mousse onto the cake layer in the assembled springform pan. Arrange 1/2 c. the amount of reserved strawberries (not including the 12 for decoration), stem side down, into the mousse. The strawberries should be arranged in two rings: the first ring being 3/4 inch from the outside edge of the cake and the second, inside ring, being 3/4 inch away from the first.

Distribute 3 c. mousse over the berries, being careful to keep the berries in position. Holding the pan by the top rim, gently but firmly tap the bottom of the pan 2-3 times on the work surface (this will eliminate air pockets). Position a cake layer on top of the mousse and then repeat the process used on the first cake layer (1/2 c. mousse, remaining strawberries, and 3 more c. mousse). Top the mousse with the remaining cake layer and gently press into position. Refrigerate the cake for 2 hours (do not freeze).

To make the ganache, heat the heavy cream, butter, and sugar in a 2 1/2-quart saucepan over medium-high heat. When hot, stir to dissolve sugar. Bring the mixture to a boil. Place the chocolate in a stainless steel bowl. Pour the boiling cream over the chocolate and allow to stand for 5 minutes. Stir until smooth. Allow to cool to room temp.

Refrigerate 1 c. of the semisweet chocolate ganache for at least 1 hour. Keep the remaining ganache at room temperature until needed.

Remove the sides of the springform pan (do not remove the bottom of the pan from the cake; this will make it easier to handle the cake later). Use a cake spatula to smooth and fill in the sides of the cake with 2-3 T. of room temp ganache. Evenly spread the remaining amount of this ganache over the top and sides of the cake. Refrigerate the cake for 1 hour.

Transfer the chilled cup of ganache to a pastry bag fitted with a large star tip. Remove the cake from the refrigerator. Pipe a circle of 12 evenly spaced stars along the outside edge of the top of the cake. Place a strawberry, stem side down, into each ganache star. Refrigerate the cake for 30 minutes.

Cut the cake with a serrated slicer. You may need to allow the slices to come to room temperature for about 15 minutes before serving.

Eat two pieces: after all that, you've definitely earned it!